All electric gate systems require regular inspection, servicing and maintenance throughout their life. Maintenance and servicing carried out by our qualified technicians is the key to the long term reliability and safety of your gate investment.
Preventive Maintenance Programme:
Safety check & Service intervals: Every twelve months or every 2,500 cycles (full operation open and close = 1 cycle)
Preparation and Cleansing
- 1 Sweep equipment external surfaces with a soft bristle hand brush and wipe motors.
- 2 Visually inspect all systems and report any significant damage or deterioration to equipment or decorative finish.
General
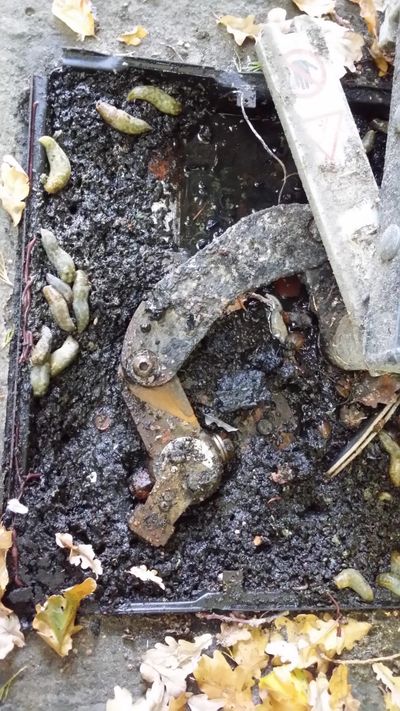
Inspect and sweep out any debris from motor pits and rail gullies. Report any flooding or excessive build-up of debris to client.
- 3 Inspect installation generally and check squareness and levels. Report any variations.
- 4 Run motor(s) and check operation of each item of installed equipment for evident visible
- 6 Clean and lubricate hinge bearings, locks, drive systems and control gear.
- 7 Check mechanical clearances and running tolerances. Note any excessive or unusual wear patterns.
- 8 Check physical stops at each end of travel of gates/barrier arms. Report any signs of damage or over-run.
- 9 Carry out visual check of underground loop chases for erosion of sealer.
- 10 If sealer is damaged, carry out electrical conductivity and leakage tests on underground
loops – megameter impedance better than 1.0 MgOhm dry or 0.5 MgOhms damp – (after consultation with client if not covered by warranty).
- 11 Upgrade processor firmware to approved version of safety software to meet current
safety standards (if applicable).
- 12 Inspect and test fixtures and fittings and electrical equipment for visible deterioration. Replace or repair cables as necessary (after consultation with client if not covered by warranty).
Pedestrian gate (as applicable)
- 13 Visually inspect and test electric lock mechanism. Clean and lubricate shoot/release bolt.
- 14 Check gate closer mechanism gas pressure. Report if pressure is below/above appropriate level.
- 15 Lightly grease hinge bearings and closer pivots.
Accessories (as applicable)
- 16 Inspect and test digital keypad. Report any vandal damage or other
- 17 Check defects on intercom system – Change codes if necessary
- 18 Reset any timers for summer time/winter time if necessary.
- 19 Test every item of equipment for satisfactory operation and sign off.
Sliding Gate Installation Pass
- 23 Ensure that cover vents are clear of debris and brush out apertures. Report any ingress of
water.
- 20 Scan running rail by taking line of sight. Report any damage or variation.
- 21 Check security of motor fixing bolts and base plate. Report any deterioration of concrete base.
- 22 Check motor cowling and brake cover for signs of overheating. Report any abnormal condition.
- 24 Check electrobrake efficiency at each end of travel.
- 25 If authorised: – Remove covers, strip down electrobrake system check/replace electrobrake pads and adjust clearance to the recommended tolerance.
- 26 Check motor fail safe run time by noting relay contact drop out delay timing.
- 27 Test and approve manual release mechanisms. Lubricate lock with WD40
- 28 If authorised: – Strip down manual release mechanism and clean/lubricate with graphite as required.
- 29 Check/adjust guide rollers and ensure tightness of fixing nuts.
- 30 Check upper guide rollers for flat spots indicating slippage. Report if worn.
- 31 Jack up gate at each end and check side play on roller wheels. Check and tighten wheel nuts.
- 32 Check free movement of limit switch actuator arm(s) and roller(s) and check for flat spots.
- 33 Check tightness of fixing screws.
- 34 If authorised: – Remove limit switch assemblies and replace.
- 35 Check limit actuators against closing/opening positions of gate and adjust as necessary.
Sliding Gate Motor and Transmission Gear
- 36 Check and adjust pinion/rack-meshing backlash, resetting gap to provide recommended
clearance.
- 37 Test pinion shaft end float. Report undue travel.
- 38 Apply graphite compound sparingly to pinion teeth faces if required –
DO NOT USE OIL OR GREASE
- 39 Adjust limit toggles to maintain correct clearances at each end of gate travel.
Swing Gate Installation
- 45 Scan pivot hinge alignment by taking line of sight. Report any damage or variation.
- 46 Check security of motor fixing bolts and base plate. Report any deterioration of concrete base(s).
- condition.
- 48 Ensure that vents and moving parts are clear of debris and brush out underfloor motor chambers. Report any ingress of water.
- 49 Check slow down efficiency at each end of travel – check gate does not slam.
- 50 If authorised: – Remove covers, strip down motor system check/replace any damaged or
- 47 Check motor cowling and covers for signs of overheating. Report any abnormal
- worn parts and adjust to the recommended tolerances.
- 51 Check gate hinges for wear. Report if unduly worn.
- 52 Lightly grease hinge bearings and end roller (if fitted).
- 53 Test and approve manual release mechanisms. Lubricate lock with WD40.
- 54 If authorised: – Strip down manual release mechanism and clean/lubricate with graphite
as required.
- 55 Check/adjust motor run time by noting relay contact drop out delay timing.
- 56 Check operator pivots and lightly grease bearings. Check and tighten fixing nuts.
- 57 Check free movement of limit switch actuator arm(s) and roller(s) and check for flat spots.
- 58 Check tightness of fixing screws.
- 59 If authorised: – Remove limit switch assemblies and replace.
- 60 Check limit actuators against closing/opening positions of gate and adjust as necessary.